Monday, June 24, 2013

Auto Upholstery Redwood City - How to Get Creases Out of a Leather Car Seat - Cooks Restoration Redwood City (650) 364-0923

Leather Car Seat


leather car seat needs special care and attention. It can develop creases over time. Here's how to get rid of creases in a leather car seat, as well as a few tips to help you take better care of your seats.
Removing Leather Creases
Turn on an iron to the coolest possible setting. Let it run for a bit and make sure that it's not giving out any water or steam. Lay the paper bag flat on the crease in your car seat, covering as much of the crease as possible. Iron over the paper bag to press out the crease. Make sure that you move the iron a lot to prevent it from burning the leather. Repeat the process for each crease on the seat.
Extra Care for Your Leather Car Seat
Consider the following when caring for your leather:
  • Excessive exposure to direct sunlight will damage your leather car seat. Your seats will likely get exposed to a lot of sun every time your car is parked outdoors. The best solution is to place a sun shade on your windshield to keep your leather car seat in the shade no matter where you park
  • Excessive heat will damage car seat leather just as much as sunlight. If you live in cold climate, this might not be much of an issue, and leather generally does better in colder regions. However, even moderate outside temperatures can cause the interior of a car to heat up to 100 degrees or more if parked in the sun with the windows closed. Opening your windows just a crack when you have to park in the sun will help keep the car's interior at less damaging temperatures
  • Never wipe your leather seats down with paper towels or something similar. Anything that's made of paper, no matter how fine it is, will leave scratches in leather. Use cotton towels instead. Better yet, rip up some old t-shirts and use them as leather car seat rags. Some auto supply stores even sell fragments of t-shirts for use as leather-friendly cloths
  • Make it a habit to periodically wipe your leather car seats down with leather conditioner. Leather conditioner can be found in most auto supply stores. Apply generous amounts of conditioner to a cotton cloth and spread it evenly and liberally over your car seats. If it's been done properly, a wet film should be left behind on the leather, which will gradually soak in
 

Friday, June 21, 2013

Auto Upholstery Redwood City - How to Repair a Torn Leather Car Seat - Cooks Restoration Redwood City (650) 364-0923


Car leather repair doesn't have to be taxing and can be carried out by most novices. Leather is one of the most attractive interiors that you can have in a car, so keeping it in good condition is paramount. Small or large tears can be repaired in a short space of time using a simple procedure.

Tools and Materials:

  • Nail scissors
  • Warm water or rubbing alcohol
  • Small pieces of cloth
  • Some cotton wool
  • Replacement leather
  • Adhesive glue
  • A small piece of sandpaper
  • Dye (your choice of color)
  • Leather conditioner

Step 1: Tidy the Tear

Tidy up the current tear in the leather car seat. Use a pair of scissors to cut away any rough areas or edges on the tear. Use nail scissors if there are only a few strands of material sticking out from the tear. This will make the repair easier and will leave the leather looking more attractive afterward. It will also let you reach beneath the tear with your fingers without the risk of making it worse.

Step 2: Clean the Tear

Use some warm water and a cloth or some cotton wool and rubbing alcohol to thoroughly clean the tear. Make sure you clean the surrounding area of the tear both above and beneath it. This should stop the replacement leather from becoming dirty in a short space of time. It should also stop the current leather from losing color around the edges of the tear.

Step 3: Cut Replacement

Cut out a replacement piece of leather. Either buy this leather to match the interior of your car or use a leather repair kit. Make sure you cut an excess of about one inch, as this will entirely cover the current tear in the leather. The excess will allow for a margin of error and will soak up the dye so it doesn't seep into the original color and spoil the interior of the car.

Step 4: Smooth and Sand

Apply some strong adhesive around the edges of the tear in the seat. Place the replacement leather over the top. Allow a few hours for the adhesive to dry and then sand around the edges to remove any excess glue and rough edges. This will reduce friction when you have to apply different agents in later stages.

Step 5: Color the Leather

Use a small amount of dye to color the replacement leather so it matches the rest of the car. You can buy dye specifically for this job or use one in an auto seat leather repair kit. Use a small cloth to evenly apply the dye over the patch and a sponge to gently rub away any excess dye and color. If you get the color wrong, it will be obvious where you have done your handiwork.

Step 6: Condition the Seat

You need to condition the repair to make it look better and seal all of the work done so far. Apply some leather conditioner over the patch and a small cloth to even it out. This will give the repair work a glossy finish. It will look like a unique leather design as opposed to a repair, once the conditioner has dried.


Auto Upholstery Redwood City - Three Types of Leather Car Seat Covers - Cooks Restoration Redwood City (650) 364-0923


Leather seat covers in a car are a great way to cover up cloth covered seats that are wearing out or have holes in them. Car leather seats are sought after because they add a sense of richness and class to the vehicle's interior. There are many different kinds of car leather seat and covers, so no matter what impression you want the inside of your car to give off, there is a type of leather seat cover for you. The following is a list of some of the most popular types of leather car seat covers.

NuBuck

NuBuck is a type of leather that closely resembles suede. It is kind of fuzzy and feels a little soft, not slick like most types of leather. Of all types of leather commonly used to make leather car seat covers, NuBuck is the easiest to scratch and stain, so it may not be the best for you unless you regularly practice interior car maintenance.

Top Coated/Protected

The most common type of leather for car seat covers, Top Coated leather is much more smooth and uniform in appearance than NuBuck. It does not display the natural leather markings you would expect on leather because it is coated with a seal for protection. Top Coated leather makes up about 90% of the leather used in cars or on furniture.

Imitation

If you don't want to pay for real leather, you can get plastic seat covers that are made to look like leather. The plastic is textured to appear like leather but it is actually much more durable. Imitation leather can also come in many different colors to match your car's exterior.


Thursday, June 20, 2013

Eliminate Lower Back Pain Automotive Orthopedic Seat Sculpting Bay Area - Cooks Upholstery and Classic Restoration (650) 364-0923


Do you experience lower back paid while driving?  Our team of experts here at Cooks Upholstery can re-sculpt your car seat to fit your back and significantly reduce your lower back pain while driving.

Research shows that it is a lot easier to get comfortable in your seat when the car is stationary, a bit like sitting in a normal chair. But once you start driving the body will be subject to various forces like accelerations and decelerations, lateral movements from side to side and whole body vibrations.  When we sit on a chair our feet rest on the floor and are used to supporting and stabilizing the lower body.  While driving our abdominal muscles can not provide enough stability to our upper body and arms when turning the wheel.  This will result in a significant increase of torsional stresses in the lower back, which in return will significantly increase the risk of low back pain.

Our team of experts can re-sculpt your car seat to fit you back and significantly reduce your lower back pain while driving.

http://www.cooksupholstery.com

Wednesday, June 19, 2013

Auto Upholstery Redwood City - Interior Restoration of a 1938 Lincoln Zepher - Cooks Restoration Redwood City (650) 364-0923


The 1938 Lincoln Zephyr’s low and horizontal mustache grille may not look very revolutionary to most of us today, but it played a key role in triggering one of the most significant and lasting design transformations, not unlike the 1959 GM cars and the 1960 Corvair. GM Styling Head Harley Earl was quoted as saying: “Oh my God, how did we miss on that one? That’s going to ruin us”. Ironically, the new grille was not the result of stylistic creativity for its own sake, but the very pragmatic solution to a technical problem.


The 1936 and 1937 Lincoln Zephyrs had a very handsome front end, designed by Gregoire to make the radical rear-engined Zephyr concept by Tom Tjaarda look more conventional, along with its front engine. Gregoire gave it the pointed upside-down boat-hull prow that he knew Edsel Ford favored. And as a result, the Zephyr avoided the controversial looks of that first American streamlining attempt, the Chrysler Airflow.


Cooks is doing a complete interior bringing it back to it's original condition.  The biggest challenge is getting the right interior which requires going through many samples and working with many sources such as the Lincoln Zepher Club, specific original cars and the Academy of Arts.

This will be a fun project and we know it will turn out spectacular.

http://www.cooksupholstery.com

Tuesday, June 18, 2013

Auto Upholstery Redwood City - How to Re-dye Leather Car Seats - Cooks Restoration Redwood City (650) 364-0923


Re-dying leather car seats will give the interior of your car a new lease on life. Not only will it make worn seats look like they have come straight out of the showroom, but re-dying leather car seats will help make the old and stiff leather feel soft and supple. Whilst re-dying car seats is not that complicated, it can be a lengthy process as it needs to be done in two stages so plan accordingly and allow yourself plenty of time to complete the process.

You Will Need:

  • Cheesecloth Polishing Cloth
  • Terrycloth Towel
  • Leather Surface Prep Solution
  • Leather Dye
  • Acrylic Brush (optional)
  • Vinyl Gloves
  • Damp Cloth

Step 1 - Prepare the Leather Surface

Ensure the surface is clean before starting. Cleaning car leather is a vital part of ensuring the remainder of the task can be completed correctly. Pour the fresh lacquer thinner onto a clean terrycloth shop towel and rub into the leather car seats in circular movements. This will remove the old car leather dye. Apply more of the lacquer thinner until the whole of the seat is covered. Always work on one seat at a time. Leave the seats to dry for several hours and then clean down with a damp cloth.

Step 2 - Apply the Dye

Put on the vinyl gloves to avoid dyeing your hands and put a small amount, usually around 10 drops, of the leather dye onto a dry cloth. Be sure to blot the cloth with another cloth to avoid too much dye being applied. Concentrate on a single section at a time and gently rub the dye into the leather car seat, once again using a circular motion to ensure the dye is being worked into the leather.
Pay particular attention to the seams and piping to make sure the dye is covered evenly. The dye can also be applied with an acrylic brush although using a cloth gives greater control over the dye. Use the cloth to rub the dye all over the leather car seat. Work with small amounts at a time to avoid applying the dye too thickly. If part of the surface is blemished, apply a heavier overall coverage. Once you are happy you have an even coat which has covered the whole of the leather car seat, leave for approximately 2 hours.

Step 3 - Apply a Second Coat

If the leather car seats look too light in color, applying a second coat of dye will darken it. A second coat can also help cover any blemishes like streaks or areas with darker grain. Make sure the seats are completely dry before applying further coats. Alternatively, if the opposite problem has occurred and, by applying too much leather dye your seats look too dark, use surface prep liquid to remove some dye from the surface of your leather car seats.   

Step 4 - Let the Dye Set and Buff Up

The final step is to allow the dye to set into the leather car seats and polish them. Avoid touching the seats for 48 hours. Once they are completely dry, take a cheesecloth polishing cloth, which are available from hardware and auto parts stores, and hand buff the leather seats until you are happy with the finish. The more 'elbow grease' you use when buffing, the shinier your leather car seats will become. Apply pressure accordingly until you achieve your desired finish.


Saturday, June 15, 2013

Auto Upholstery Bay Area - 1961 Cadillac Eldorado Biarritz Convertible Interior - Cooks Upholstery Redwood City


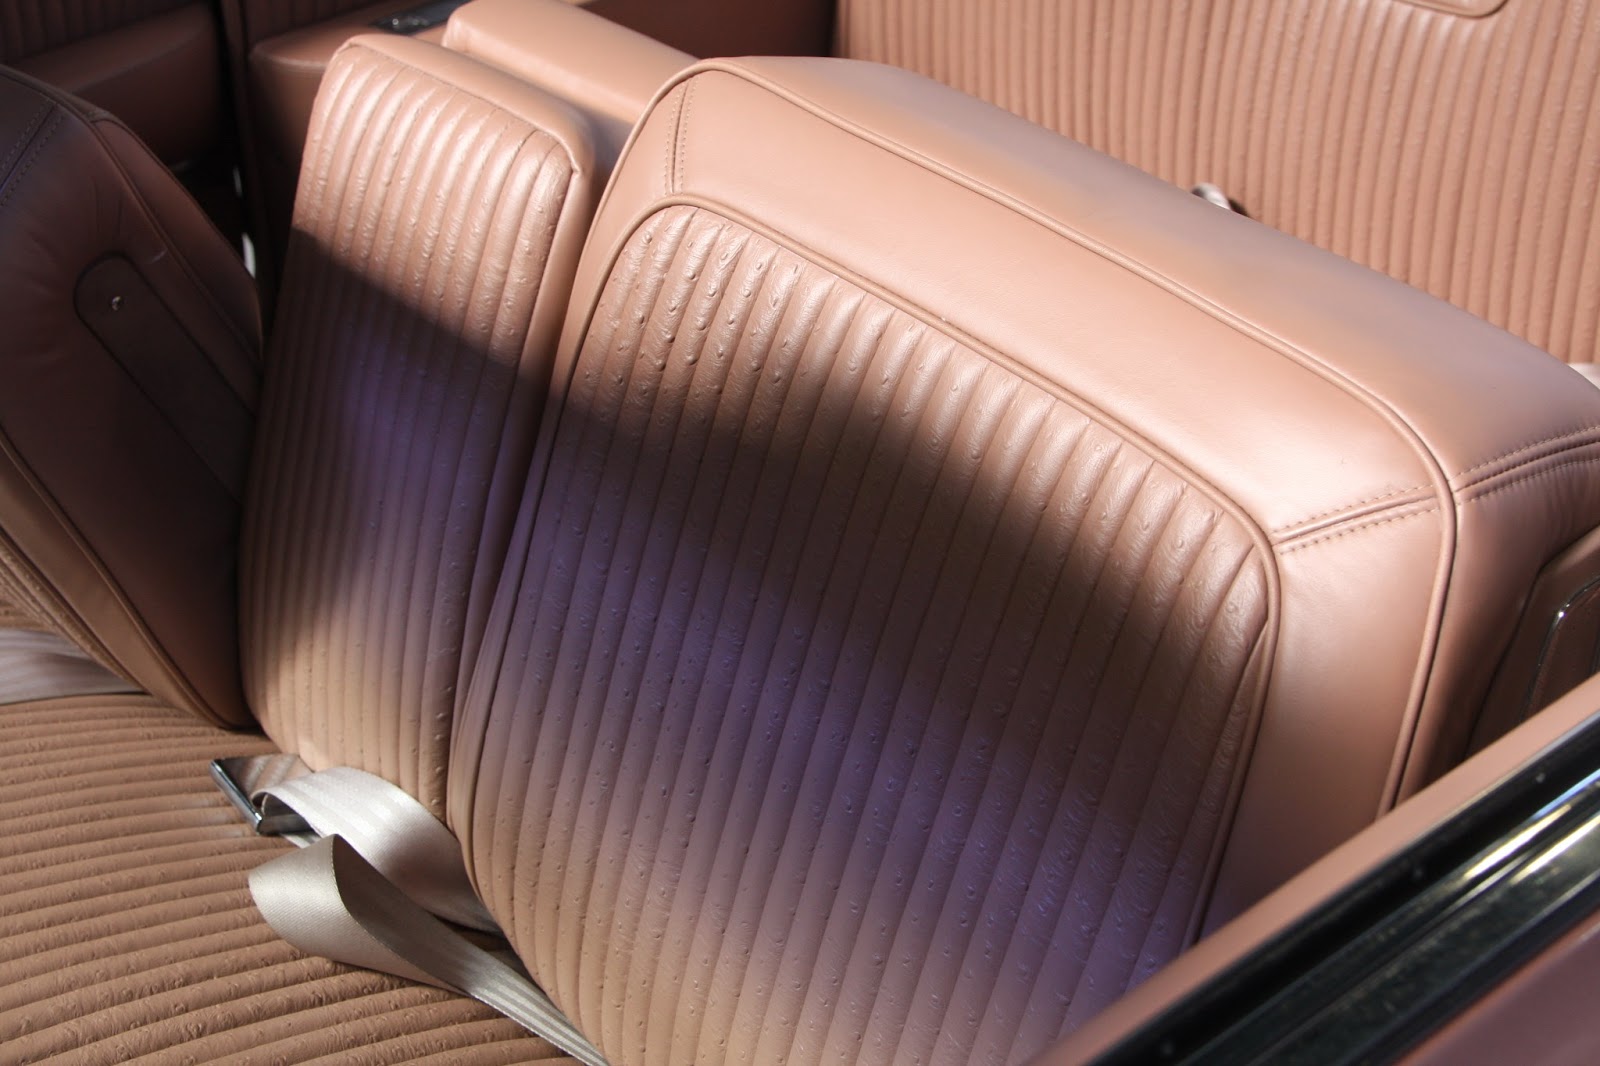
We have done a complete new interior and top boot on this unique Cadillac Eldorado Biarritz Convertible.  This is a very unique Ostrich interior.  Their was a lot of hand crafting that was incorporated into the Biarritz.  This interior has all hand rolled pleats.


The 1961 Cadillac Series 62 Eldorado Biarritz Convertible was priced at $6,500 with 1,450 examples produced. Powering the car was an overhead valve V-8 engine that displaced 390 cubic-inches and produced 325 horsepower. It had power vent windows, six-way power bench seat and even a remote control trunk lock. 

The styling for 1961 was updated, with a new grille that leaned back towards both the top of the hood and the bumpers. The wraparound windshield found on the 1960 models were replaced with non-wraparound glass. In the back, the familiar tailfins could still be found. The rear tail-lamps were vertical in 1960, and horizontal for 1961.

By Daniel Vaughan

http://www.cooksupholstery.com