Thursday, December 26, 2013

Auto Upholstery Bay Area - How to clean your car upholstery - Cooks Upholstery Redwood City 650-364.0923


If you use your car every day, the upholstery won't look as elegant as it did when you first bought it. But if you clean the upholstery regularly, you can maintain a fresh interior for those daily commutes.
Know how to clean a mess
Michael Wilson, CEO of Fibrenew (a leather and plastic restoration company), said, "Kids and adults trying to juggle food, drinks and toys on the road can cause damage to car seats, but often times the worst problems are caused by car owners who don't know the best ways to clean up a mess and repair a problem."
Knowing how to care for your upholstery essentially means knowing the appropriate product for the surface. These substances have been developed to properly cleanse leather, carpet, rubber or vinyl, so you don't want to apply one to the wrong surface at the risk of irreparable damage. There is no catch-all product that should be used for the upholstery of every car, but before applying the products, every car's interior should get a thorough vacuuming.
Vacuum
The best way to keep your car's upholstery looking good is general maintenance.
Cary Zelich, market manager at automotive maintenance manufacturer ITW Permatex, recommends vacuuming as regularly as you would your home because it "lifts the fibers back upright and also prevents the deep set-in of dirt."
However, you won't be able to use the same vacuum that you purchased for your living room rug. There are special car vacuums with interchangeable parts, designed to reach the various nooks of your automobile. When you vacuum, remember to remove any mats that could obstruct a thorough cleaning. Vacuum beneath the mat and then vacuum just the mat before putting it back in the automobile.
Leather
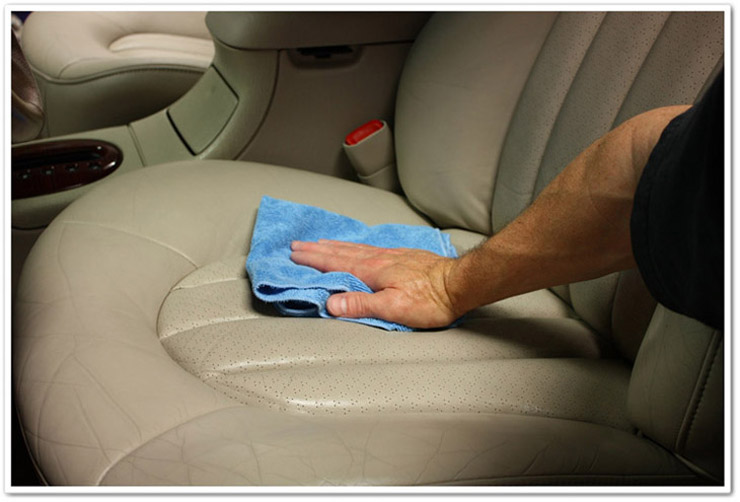
With leather upholstery, you should only use a damp towel for minor food or drink stains, before any spill soaks through the leather. Experts at Fibrenew noted that fully-finished leather is largely water resistant, so if you clean the spill early enough, it won't require much.
For stains that have set or to get rid of harsh materials (nail polish, ink), you will need to use a leather cleaner and a soft sponge. You should avoid anything harsh that hasn't been made specifically for leather, such as dish soap, hairspray or window cleaner.
For car scratches in leather, Fibrenew suggested snipping off the protruding cotton strands from the interior, blowing a hair dryer on the scratch and massaging it with a leather cleanser.
Rubber and vinylRubber and vinyl will require particular cleaning materials. Like leather, there are specialty cleaners made specifically for these surfaces. There are home remedies as well.
Zelich recommended cleaning vinyl seats by wiping them with baking soda on a damp rag and then rinsing with dish-washing detergent and water. She explained, "Baking soda is gentler on vinyl than oil-based cleaners, which can cause the vinyl to harden."
Bob "Max" McKee, CEO and Founder of the Palm Beach Motoring Group, reported that rubber and vinyl are particularly vulnerable to deterioration caused by the sun. You should invest in an interior protectant, which is available at many car supply stores.
CarpetThe carpet goes through more contact than the rest of your interior. Every day, you step on it, and after a short time, this begins to show. You should take precautionary measures by spraying your carpet with stain repellents. Also, you need to ensure that you use quality stain repellents because inferior or knock-off products could prematurely age your carpet without offering much protection at all. If you do get a stain on your carpet, use a spot remover that has been specifically developed for carpets.
 

Friday, December 20, 2013

Auto Upholstery Bay Area - Tesla Roadster Seats - Cooks Upholstery Redwood City 650-364.0923


There are many reasons that a car owner may find him or herself needing to buy replacement front seats. For some people, the added comfort and personalization achieved through aftermarket car seats represents the perfect addition to a car. For others, the attempt to rebuild an old car or the effects of an accident necessitate the purchase. Regardless of the journey up to this point, however, buying replacement front seats for your car can be a challenge and this guide is designed to help with that.
Basic Replacement Front Seat Considerations
Most people never even consider the fact that a car’s seats, like most of its parts and accessories, are completely replaceable. Indeed, until we need them, front seats in a car are taken for granted. However, when either situation or preference presents itself, it is helpful to know that buyers have a few basic decisions to make regarding those seats.
This decision, of course, includes characteristics such as color and material. However, those options tend to be specific to makes and models of cars.

Tesla Roadster Seats are now available at Cooks Upholstery. Cooks has been working with Tesla and now offers any custom work or replacement of your original Tesla Seats.

Thursday, December 19, 2013

Auto Upholstery Bay Area - Tips to Avoid Classic Car Restoration Headaches - Cooks Upholstery Redwood City 650-364.0923


We've all heard the stories. "I bought this great new restored car and took it in for a minor improvement and it ended up costing me thousands." Or, "this car looked great in the pictures but turned out to be nothing like what was suggested." The following tips mixed with examples from his real-life experiences to help keep the classic enthusiast aware and on the right track. Check body panels to ensure dents have been fixed properly -- magnets don't necessarily work

"One project worked on was a 1967 Pontiac GTO,". "Once the body was  stripped  down to the bare metal,  the quarter panels were filled with literally pounds of body filler. The right quarter had been brazed together (not welded) in two separate sections. This is an example of one of the most common horrors that are found; people just filling dents, instead of working the metal to the original shape and then using the filler as it was originally intended for." But be aware, magnets aren't fool proof.
 "Another great project we had was on a 1970 Plymouth Superbird,"  "Purchased by the customer as a restored vehicle, the seller provided three photos of the restoration: One photo in the weeds, one photo in primer and one photo painted. The customer had the car for about six months when he noticed the paint was bubbling in several areas. At this point, he has someone look at the car. You could see the body was absolutely straight and you could not see any evidence of anything wrong."  The prep job was not done properly and the paint would need to be stripped and repainted,"  "When the body was stripped down to bare metal, the results were absolutely horrified. The quarter panels had been rusted and filled with body filler. The body filler had metal shavings mixed in it, so magnets would stick when the buyer checked it. The roof had been filled in the same manner to cover an extensive amount of hail damage. The trunk lid and hood were in the same condition. The trunk floor had been completely rusted out and they had placed cardboard in the holes and then fiberglassed over it. They actually took the time to make all the unique grooves and lines in the floorpan to make it look original. The hood skin had to be removed and a new skin fabricate and welded it back on the hood frame since there was so much hail damage. The hood would not stay open when you originally looked at the car. The thought was that the hood hinges were weak. It turned out the hood would not stay open from the extreme amount of body filler in the hood skin. With the installation of the new skin, the hood stayed open as it was supposed to. The nose cone was made out of aluminum and had been the victim of several impacts throughout its life. They filled the dents with an aluminum-based filler. By the time the car was finished, the customer had spent $50,000 restoring it. This was after he had purchased it for $40,000. Definitely not what the customer had originally planned on." So, when looking at photos, look for images that show the car sanded down to be bare metal. Sellers, when having a vehicle restored, take plenty of photos or have the shop doing the restoration take photos of every stage of the restoration process. The more photos, the better backup and support they provide to your claims.

source: http://www.motortrend.com/auto_news/c12_news060323_classic_car_restoration/


http://www.cooksupholstery.com

Wednesday, December 18, 2013

Auto Upholstery Bay Area - Dash Restoration on a 1958 Corvette - Cooks Upholstery Redwood City 650-364.0923


Re-did the dash in this 1958 Corvette.


The 1958 Chevrolet Corvette, considered part of the original C1 series, was fitted with a solid rear axle. It received fairly extensive restyling for that model uear, being fitted with quad headlamps and bright trim changes, a curvaceous instrument pod above the steering column with a center console and standard seat belts. The base engine was a 283 cubic-inch V8 powerplant delivering up to 290 horsepower depending on carburetion or fuel injection option selected. 


by Daniel Vaughan
http://www.conceptcarz.com/vehicle/z210/Chevrolet-Corvette-C1.aspx


http://www.cooksupholstery.com

Tuesday, December 17, 2013

Auto Upholstery Bay Area - Top Ten tips for Classic Car Restoration - Cooks Upholstery Redwood City 650-364.0923


While this is a very exciting activity a car owner must know how to properly evaluate the condition of a car and then establish the level of restoration to be performed to such vehicle. There are 4 levels of classic car restoration, each one should be applied individually depending on the kind of project, budget and purpose. These are the top 10 tips for those classic car aficionados who want to reverse the effects of 'the sands of time' on their vehicles:

1. Sit down, grab a piece of paper, a parts catalog which would be relevant to the model you want to restore and run some numbers within your budget. Never deviate from it, otherwise the results will be obvious.

2. Inspect your car very carefully, top to bottom, inside and out; use strong flashlights to inspect the trunk, the engine area, etc. This will help you see the kind of repairs needed to be done to this vehicle. If possible take it to a car shop where it could be lifted to take a good look at the condition from beneath. Here you will determine if a the restoration process is worth the time and money.

3. After inspecting the vehicle, it is also important to decide whether you have a 'solid' car which can be restored without replacing the entire frame, floor, axles, etc. It would amaze you how this step can save you major dollars. By 'solid car' we are inferring that the car structure should be strong, as well as the floor; a little rust can be repaired but a completely rusty car which has the entire frame compromised will eventually crumble.

4. Decide whether you want to work with a "friend who knows how to repair cars" or a professional. It is often recommended not to involve friends and family on such projects as the time and money invested on this process may cause some trouble if the right procedures are not followed. Cars restored by people other than professionals tend to run well for a couple of years and in some cases start to breakdown thereafter.

5. Have a car restoration professional run some numbers and make sure they match or are close to the numbers you ran on step 1.

6. Decide the level of car restoration:

* Driver restoration: is often performed to get a car back to a fully functional and operational condition, they often include part replacement and minor cosmetic adjustments.

* Street Show: this restoration level involves getting a car into a fully working condition and repairing all major cosmetic problems (body work is required). If judged by a professional it should fall within the 80-89 point range.

* Show Car: restoring a classic car back to this form often requires professional work, if judged by a professional, there restorations and labor quality will fall within the 90-95 point range.

* Concours: this is the highest level of car restoration possible. All the work should be done by professionals, from part replacement to body work. These type of cars are intended for auto shows or private collections and not to be driven. Obviously, the original car to be repaired must be in quite optimal condition to achieve this stage, otherwise a major investment is necessary.

7. Start the restoration process, if possible follow a 2 step procedure (part replacement and chassis adjustments). Visit the car shop as often as possible to make sure the right work is being done. If this is not possible then have your mechanic send you periodical picture updates through email.

8. After the part replacement process is done, visit the shop again to re-inspect the chassis repairs needed, if sheet metal patches are necessary then remember to document the places where they are to be applied.

9. When all major restorations are done run a close and detailed inspection just like it was done during the second step to make sure everything is OK. Take it for a ride and see if it works correctly.

10. Remember to give proper maintenance to your newly restored classic using all the recommended parts and products.

The trick to getting newly restored cars to last for a long time lies within the last step, if the vehicle is properly maintained, in time, it will become a valuable asset and a sure head turner.
 
source: http://www.streetdirectory.com/travel_guide/159800/cars/top_10_tips_for_classic_car_restoration.html
 
http://www.cooksupholstery.com

Monday, December 16, 2013

Auto Upholstery Bay Area - 1968 Pontiac GTO, New Headliner, Carpets and Door Locks - Cooks Upholstery Redwood City 650-364.0923


The Pontiac GTO, in all respects a muscle car, debuted in 1964 and continued until 1974. John Zachary DeLorean, best known for the Delorean automobiles, was the individual who forced the development of the legendary GTO. The vehicle was very successful because it was able to capitalize on a segment of the market that had not been fully realized. Most of the muscle cars during this time were full-size cars. They had large engines, but due to the weight they were usually slow to accelerate. Pontiac offered a combination of 389 cubic-inch engines in their mid-size Tempest line and called it a GTO. The name GTO comes from Ferrari. It means Gran Turismo Omolgato. 
The GTO package included the V8 engine, premium tires, special hydraulic lifters, dual exhaust, manual three and four-speed transmission with a Hurst shifter, heavy-duty clutch, improved suspension, a 3.23:1 rear axle ration, dual hood scoops, GTO emblems, and bucket seats. The 389 cubic-inch engine was rated at 325-348 horsepower depending on the configuration and modification of the engine. The 428 ft-lbs of torque was even more astonishing. Placing this mammoth engine in a mid-size sedan created a vehicle that was untouchable. It was available in both the coupe or convertible body styles. Pontiac sold nearly 32,500 GTO's during the first year.

For 1965, the Tempest GTO received cosmetic and mechanical updates. The engine was modified and was now producing between 335 and 360 horsepower with a torque rating at 431 ft-lbs. The headlights of the vehicle were modified; they were now in stacked configuration. The dual hood scoop was replaced with a single hood scoop. Over 75,000 examples were sold in the second year.

A dealer cold air induction kit for the Tri-Power cars helped stimulate sales and increased the horsepower of the vehicle. The induction kit made use of the hood scoop and brought about the Ram Air package. 

For 1966, the GTO became its own model. There were styling changes mostly concentrating on the roof and the rear lights. The engines were unchanged, however, during the middle of the year the multi-carburetor setup was no longer offered. The GTO was still more popular than ever, selling 96,946 examples during 1966. 


In 1967, a new 400 cubic-inch engine was introduced. The horsepower rating was between 255 and 360 horsepower depending on the configuration. The torque rating was between 397 and 438 ft-lbs. Minor styling changes occurred, mainly the grill and the rear of the vehicle. During the 1967 model year, nearly 82,000 GTO's were sold.

In 1968, the wheel base was expanded to 112 inches and now sat atop General Motors split wheelbase A-body. Major styling changes occurred. A rubber bumper, labeled the Endura, adorned the front of the car. Hidden headlights were optional equipment. The engine choices remained the same but the horsepower and torque was increased. The 440 was not producing between 265 and 360 horsepower while the torque ranged from 397 through 445 ft-lbs.

In 1969, the competition was becoming fierce. To compete, Pontiac offered a package on the GTO that included body paint, rear spoiler, decals, and a 366 horsepower, Ram Air III V8. A Ram IV V8 could also be purchased, increasing the horsepower rating to 370. Still a very successful year for Pontiac, there were more than 72,000 GTO's sold.

In 1970, the GTO once again received styling changes. There were now four exposed headlamps. The rear engine was 

redesigned and the body received new creases. The base engine was dropped. A 455 cubic-inch engine was introduced. The 400 cubic-inch engine produced between 350 and 370 horsepower. The 455 cubic-inch V8 produced between 360 and 500 horsepower. Sales were still strong, but dropping. A little more than 40,000 GTO's were sold. 

In 1971, sales continued to drop. Only about 10,000 were sold. GM announced that due to rising emission and safety regulations, compression ratings would have to be reduced and all engines would need to run on unleaded fuel. The horsepower ratings began to decrease. Due to a heavier chassis, introduced a few year prior, and lower horsepower ratings, the vehicle was losing its ability to be competitive. More bad news for the GTO; this was its last year as an independent model. The front end of the vehicle received minor styling updates.

In 1972, the Judge and convertible options were no longer offered. The horsepower ratings continued to go the same direction as the sales figures: down. A little over 5,800 vehicles were sold. The horsepower output was between 250 and 300. The 400 and 455 cubic inch engines were both offered. 

In 1973, only 4806 GTO's were sold. The engine horsepower decreased as well, now 230 through 250. Its muscle car status was officially gone. 

The 1974 production year was the last for the GTO. It was now an option on the Ventura model line-up. It came as a coupe or a hatchback. A 350 cubic-inch engine was the only one being offered. With a 200 horsepower rating, the car was dying a slow and very painful death. A little over 7000 vehicles were sold with the GTO option.

There were a few reasons for the GTO's decline. The muscle car era was coming to a close - or just being redefined and awaiting a revitalization. Government and safety regulations were becoming more strict. There were tough fuel regulations which severely limited the output of the engines but promoted better fuel economy. Insurance charges increased making these machines out-of-reach for many consumers. The cars became heavier, and heavier. The engine sizes decreased; The cost of ownership increased. The muscle car era was destroyed.

By Daniel Vaughan | Aug 2006
source: http://www.conceptcarz.com/vehicle/z9707/Pontiac-GTO.aspx

http://www.cooksupholstery.com

Friday, December 13, 2013

Auto Upholstery Bay Area - 1948 Hooper 4 Light Saloon Bentley Restoration Project - The Maharaja of Mysore - Cooks Upholstery Redwood City 650-364.0923


This 1948 Hooper 4 light Saloon is in our shop for Restoration. This Saloon came with a built in luggage boot at the rear. It had room for 2 to 3 people in the back and the drivers seat was able to slide back to suit the owner at 6' 1".

The construction  was of a composite English Ash with casting and metal face plywood strengthened with sheet steel plates. Built as lightly as possible incorporating fume, sound and draught prevention principles completely panelled with aluminium.

This is going to be interesting


http://www.cooksupholstery.com

Monday, December 9, 2013

Auto Upholstery Bay Area - Keeping your Leather Interior Conditioned - Cooks Upholstery Redwood City 650-364.0923


Leather is a great choice for a  car. It ages very slowly in all our mild, and relatively sunlight free climate. Plus, almost every leather equipped car comes with seat heaters… a great feature during the winter. Maintenance is relatively simple…maybe 40 minutes total a year. Read on.

Cleaning The Leather Hide

The first step in leather care is cleaning the hide. Great care needs to be taken in order to gently clean these leather surfaces. It is best to use a very mild soap mixed with warm water. You can use a very diluted mixture of Simple Green multi purpose cleaner. I would suggest mixing one ounce with ten to twelve cups of water. The first thing to do is get a clean soft terry cloth towel. Dunk the towel into your cleaning mixture and wring it out. From here wipe down the seat using gentle pressure. Be careful not to “scrub” the leather. Always use a small spot in out of the way area as a test spot. Automotive leather is surface dyed and you don’t want to remove any of it. Rub out the seat and make sure it is kept evenly damp throughout the process. Rinse out your towel several times as you do each section of the leather seats.

Removing the Cleaning Solution from Leather

The next step is to fully remove the cleaning solution. First, towel dry the seat to remove the cleaning mixture from the leather. Now using a towel dampened with clean water, gently wipe down all the leather seats. This will remove the soap residue from the leather. This step needs to be done at least two times. Next, wipe the seat completely dry with another clean soft terry cloth towel, being certain to rub very gently.

Conditioning Leather Car Seats

Next, we come to the leather conditioning step. There are several good leather conditioners on the market. Some of the best brands are Connelly Hide Food, Meguiars Leather Conditioner and Lexol. The key thing is not to use too much of the product. Apply the leather conditioner with a clean, soft sponge, not one with a scrubbing side! Soak the sponge with the conditioner and apply it to the seat evenly. Work on one leather seat at a time. The best thing to do is to apply the product and let it soak into the leather for a few minutes. Next, take a soft clean cloth and rub off all of the excess conditioner. This creates a beautiful mat finish that is not slippery. If the leather is a little hard or rough, apply a second coat. Keep in mind that all leather develops wrinkles. The important thing is to keep the leather soft so the wrinkles don’t eventually turn into cracks.

Overall, it is a good idea to clean and condition your cars leather seats two times a year. The conditioner wears off over time and is also affected by heat, UV exposure and oils from human skin. If your seats don’t appear soiled, you can skip the cleaning steps. This is especially true with fancy sports cars that don’t see much use other than those special weekend drives. So, keep it clean and keep it soft.

The real key to leather maintenance.

The real key is to be consistent. A lot of owners get caught up in buying all the right brands of cleaners and conditioners when they first buy their car, but give up on their cleaning routine after the first year. Truly, soapy water is enough to clean the seats. And any brand of conditioner will keep the seats soft. You don’t have to be obsessive about cleaning and conditioning every square inch. The driver’s seat will be the dirtiest, and the rest of the car can be cleaned quite quickly. With practice, you should be able to condition the entire interior in less than 10 minutes.
source: http://www.acecars.net/?p=1083

http://www.cooksupholstery.com

Friday, December 6, 2013

Auto Upholstery Restoration Bay Area - 34 Packard V12 Restoration - Cooks Upholstery Redwood City 650-364.0923


070808 2031 packardretu1 Packard Returns to Pebble Beach after 53 Year AbsenceIn 1955, San Francisco police officer Marvin Zukor drove his 1934 Packard V12 Convertible Victoria about 100 miles down the California coast to participate in the third Pebble Beach Concours d’Elegance. Fifty-three years later, Zukor and his prized possession will again be competing in the August 17 Concours, which has grown from a local collector car show into an annual showcase for classic automobiles from around the world.

The lineage of Zukor’s Packard is rather unique: it’s first two owners have stars on the Hollywood Walk of Fame. The car was originally purchased from a Beverly Hills auto dealer in 1933 by actor Cesar Romero, who starred in dozens of films, but is possibly best known as the Joker on TV’s Batman. The next owner was sportscaster-actor Bill Stern, who broadcast the first major league baseball game on TV. 

After World War II, the Packard somehow became a Stanford University “rally car” driven around the stadium track during football games.

“The car was used and abused when I bought it,” says Zukor. “The V12 engine had holes and was shot, there was a busted water pump and the entire car was a mess. But I loved it.”

He purchased the Packard in 1952 from a young man who, according to Zukor, had rescued the car from oblivion at Stanford, but was leaving to serve in the Korean War. 

“I originally gave it a 1950s-type restoration, including a $100 paint job, new engine and upholstery,” says Zukor, a founding member of the Northern California Region of the Classic Car Club of America. “I then showed it at the 1955 Pebble Beach Concours and got a prize for second place (in class) – a little thing to put on my dashboard.”

070808 2031 packardretu2 Packard Returns to Pebble Beach after 53 Year AbsenceZukor, who will be attending the 2008 Concours with his wife Vivian and her two children, was invited to return to the event by Chris Bock, a longtime friend and a member of the Pebble Beach Selection Committee. Bock says that his committee loves the fact that the car has been used its entire life and “for most of the past 53 years, Marvin has been pouring oil into the car and driving it around northern California. 

“As it turns out, he had a true classic car before most people even knew about classics. It’s a truly striking vehicle.” 

To ready his Packard for Pebble Beach after a 53-year absence and thousands of driving miles around San Francisco and environs, Zukor has hired classic car restorer Craig Lynch (Cooks Upholstery and Classic Restoration) to return the vehicle to pristine condition. 

“I was a San Francisco cop for 30 years, a U.S. Marshall for 15 years, in the Navy for four years and I was a Boy Scout for one year. Now, within the past few years, I’ve been focused on restoring my Packard once again. Let’s just say I’ve spent a little more on its second restoration.”
by sports car digest


Wednesday, December 4, 2013

Auto Convertible Top Installation Bay Area - Austin Healy Sprite - Cooks Upholstery Redwood City 650-364.0923


It is always nice to be able to improve a classic with a new convertible top. Check out this project on this Austin Healy Sprite.


 Austin-Healey introduced the Sprite at the Monte Carlo Grand Prix weekend in 1958. This sports car utilized parts from BMC econoboxes and did not even had a trunk lid. The luggage had to be loaded through the cockpit. Even with these inconveniences, they soon became an object of affection and brought a new level of motoring at a very affordable price. The first editions were called the Frogeye, because of the unfortunate location of the headlights. The headlights were supposed to be retractable, but remained fixed as a cost saving measure. Austin-Healey introduced an updated version in 1961, with headlights in a more traditional position. This Mark II version also added an exterior trunk lid at the rear, and front disc brakes. A badge-engineered MG Midget was introduced the same year and was nearly identical to the Healey.

source: http://www.conceptcarz.com/vehicle/z12983/Austin-Healey-Sprite.aspx
by Daniel Vaughan

http://www.cooksupholstery.com


Austin-Healey introduced the Sprite at the Monte Carlo Grand Prix weekend in 1958. This sports car utilized parts from BMC econoboxes and did not even had a trunk lid. The luggage had to be loaded through the cockpit. Even with these inconveniences, they soon became an object of affection and brought a new level of motoring at a very affordable price. The first editions were called the Frogeye, because of the unfortunate location of the headlights. The headlights were supposed to be retractable, but remained fixed as a cost saving measure. Austin-Healey introduced an updated version in 1961, with headlights in a more traditional position. This Mark II version also added an exterior trunk lid at the rear, and front disc brakes. A badge-engineered MG Midget was introduced the same year and was nearly identical to the Healey.