Thursday, January 31, 2013

Auto Upholstery Bay Area - Automotive Leather Repairing - Cooks Upholstery & Classic Restoration


After a decade of wear and tear, the leather finish sometimes crack and wears off. Replacing a leather interior for an old car is prohibitively expensive, usually running in the several thousands of dollars. Sometimes the car isn’t even worth that much! So what’s a guy to do?
I’ve read about various leather treatments and have tried most of them. There’s no saving dry, hard, cracked leather if you ask me. However, if your leather is still pliable, but there are cracks in the surface finish, there is hope. I came across a company called Leather Magic on the web. After reading lots about them and also viewing their YouTube video, I thought I would give it a try. This is my experience in pictures.
 The color of my car interior was “Light Beige” so I ordered the color with the same name on their color page for Volvos. So far so good.
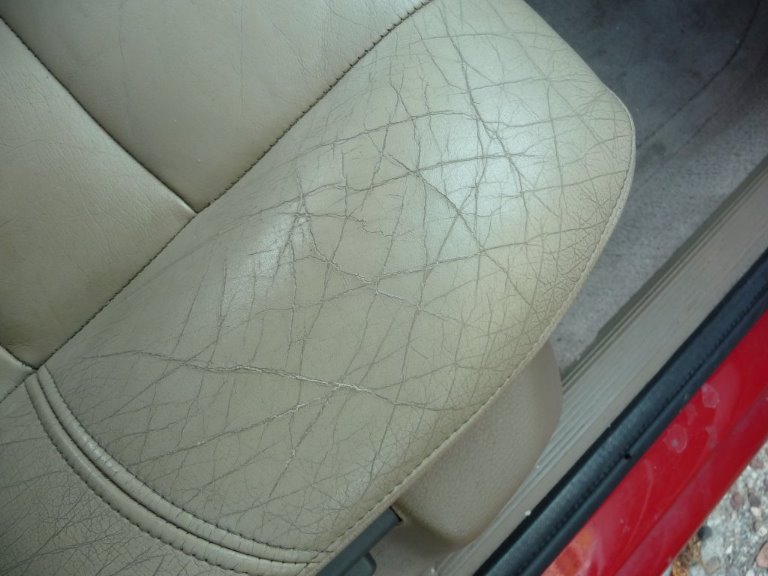
So I decided to try this on my front passenger seat first. Since it needs to sit for 48 hours after the repair, I figured I could still drive the car if I needed to. Here’s what I had to deal with.
The outside bottom panel has a lot of cracks in it.
So the first order of business was to clean it well. I used a light detergent (same as I use when I wash my car) and a nylon scrub brush. I must say that I was surprised how much dirt was removed by this simple process.
First order of business is a good scrubbing.
A light sanding with the provided 220 paper after the prep solution was applied.
This magic white stuff was quiet tacky. Multiple layers filled the cracks.
The photo above shows, the repair compound being scraped into the cracks. Between each coat I had to sand it lightly and get rid of the dust. After about 4 passes (it took a long time), the surface felt pretty smooth. OK, it’s time to color it.
The colorant (special paint) seemed a pretty good match.
After two coats with the foam brush, not much was covered...
After 3 coats, it was starting to look a lot better.
Five coats later and I think I am done.
It was getting dark as I had worked at this for about 3 hours now. I took the last picture with a flash and noticed that the color of the new area and the old area was not really matching so well. It looks like I’ll have to re-color the whole seat for a perfect match. However, look at the repair area! It looks like it’s new leather!
I showed this to my family when then came home, and they thought I had replaced the leather! So at the end of the day, here’ s my analysis.
  • It works pretty darn well.
  • It takes a long time…. 3 hours for the part I did.
  • The color match was pretty good, but in certain light, you can see a difference. Plan on coloring the whole seat.
source: http://thehuangs.com/?p=219
by song

www.cooksuphols

Saturday, January 26, 2013

Auto Upholstery Bay Area - 10 Most Important Spring Car Cleaning Tips - Cooks Upholstery & Classic Restoration


10 Most Important Spring Car Cleaning Tips


If you do not know these important spring car cleaning tips, your car may not be ready for the road trips you plan to take. Each spring, take the time to tune up and rev up your car to make sure it has the ability to help you enjoy the outdoors in the coming driving season.

Cleaning inside car

The 10 Most Important Spring Car Cleaning Tips You Need to Know

As the sun warms up, you may feel the need to roll up your sleeves and to tackle the big task of cleaning and tuning up your car. Getting rid of the winter mess inside and on the outside of your car is critical. The following are the 10 most important things you should do:
  1. Carpeting and Upholstery: Focus first on the interior carpeting and upholstery. Using a damp towel, wash down the seats. Get rid of any rock salt debris, mud or dry dirt on the carpeting using a carpet-cleaning machine, if possible.
  2. The Console: Wash the consoles carefully. Avoid getting electrical connections wet, but do wipe them down appropriately. Clean out cup holders, too. Use a wet cloth to get the top of the dashboard, but be careful to dry it thoroughly
  3. Organize: Clean out the compartments. In your rush to get inside and out of the cold during the winter, you may have debris, trash or just too much stuff in the car. Get the compartments cleaned out and organized.
  4. The Windows: Shine the windows. After all that winter driving, the windows will need a bit of extra attention. Clean the inside and outside using a window cleaner. Shine them with a dry towel. Do the mirrors of the vehicle in the same way.
  5. The Trunk: Check the trunk of the vehicle next. Clean out the wintertime mess. This is also a good time to make sure the spare tire is in good repair. Be sure your emergency kit is in order too. Vacuum the trunk out.
  6. The Exterior Body: Look at the exterior of the car. A good car washing is often in order. Make sure the first spring car wash is a thorough one that gets the winter grime out of cracks and under the edges. Use a soft towel and a mild detergent to wash the vehicle down.
  7. The Wheels: Pay some extra attention to the wheels. Remove the hubcaps and wash them down. Scrub the tires and wheel wells thoroughly. This is also a good time to check the tire pressure and to tighten up any loose lug nuts.
  8. Under the Hood: Look under the hood next. Leaves, debris and even dirt can get into the engine area. In some cases, just wiping down the edges is enough. In other cases, you may need to consider having the engine wiped off or professionally cleaned.
  9. Waxing: Waxing the exterior of the car is a good idea, as long as you do so out of direct sunlight. Choose a spray or liquid wax for the best results. If you are using a new product, test it on a hidden portion of the car's body to ensure it works properly.
  10. Replace Wipers: After a harsh winter, many vehicles require new windshield wipers. Having wipers in good working order is necessary, especially during intense spring showers.
source: http://cars.lovetoknow.com/about-cars/10-most-important-spring-car-cleaning-tips
by Sandy Baker

http://www.cooksupholstery.com


Friday, January 25, 2013

Auto Upholstery Bay Area - How to Detail a Car - Cooks Upholstery & Classic Restoration


How to Detail a Car


Whether you're hoping to save money by detailing your car or want to make sure your professional auto detailing goes smoothly, it can help to keep a few important tips in mind. There's a lot to think about when it comes to thoroughly cleaning your car's interior and exterior. However, with the right products, tools, and techniques, you can have your car looking brand new again in a matter of a few hours.

Tips for Detailing Your Car's Interior

cleaning car interior
No matter how tidy you are, your car's interior will eventually need a thorough cleaning. Over time, you'll end up with stains on the upholstery, grime in the crevices of your dashboard, and things you probably don't even want to think about wedged under your seats. A good cleaning will help you get that new-car feeling back. Keep these tips in mind.

Have the Right Tools

To clean your car's interior, assemble the right tools: a vacuum, a toothbrush, some mild cleaner, a stiff carpet brush, a paintbrush, glass cleaner, paper towels, and some lint-free cloths. Having these supplies on hand will help.

Brush Your Carpet Before Cleaning

After you've vacuumed up as much dirt as you can from the carpet and upholstery, gently brush the carpet with a stiff brush. Be careful not to disturb the carpet fibers too much, since they can be very delicate. Then vacuum the areas again.

Clean Crevices First

Use a paintbrush and toothbrush to get into hard-to-reach crevices before you clean other surfaces in the car. This keeps the grime from being compacted in these areas and makes it easier to wipe it away.

Pre-Treat Stains

If there are spots on your car's upholstery, mix up a solution of warm water and baking soda. This helps neutralize the stain, and may absorb any odor that is coming from the spot. Be sure to wash it off thoroughly.

Always Test Cleaning Products

Always test the products you use to clean your car. Since some car interior materials are very sensitive to chemicals, apply the cleaner in an unobtrusive spot first. Use great care with the cover of the car's instrument panel and the display for the stereo.

Rinse Well

After deep cleaning your car's upholstery and carpet, be sure to rinse everything thoroughly. If you leave excess cleaning solution in the fabric, it will attract dirt. Also pre-treat any stains to make removal easier.

Use a Dedicated Leather Cleaner

If you have leather upholstery, consider using a pH-balanced leather-cleaning product like Zymol Z507or Lexol. Leather is a natural material, and while it is tough and resistant to tears, it does need to be cared for with gentle cleaning products.

Exterior Car Detailing Tips

cleaning car exterior
Your car's exterior also takes a lot of abuse. From road salt to sunlight, a variety of substances and situations can lead to dull paint, scratches, and stains. Keep these tips in mind to get professional results at home.

Always Clean a Cool Car

When cleaning your car's exterior, you should park it in a shady spot, and wait for it to cool off from any recent drives. If your car is hot when you wash it, the soapy water will evaporate from its surface, leaving white soap spots on the paint.

Start with the Wheels

When cleaning your car's exterior, start with the wheels and wheel wells. This is the dirtiest area of the car, so it's best to keep the mud from splashing up onto the rest of the vehicle. After the wheel area is clean, continue cleaning the car from the top down. If you're planning to clean your car's engine compartment, it's also a good idea to do this area first.

Don't Forget the Rims

Use a soft toothbrush and some wheel cleaner to detail your car's rims. It can be difficult to remove the brake dust that accumulates on the wheels, but this step will really improve the appearance of your vehicle.

Use a Clay Bar After Washing

Use a clay bar, which you can buy at auto supply shops like AutoGeek.net or Chemical Guys, to remove impurities that remain on your car's clear coat after washing. Clay bars can help you minimize scratches, remove industrial pollution, and get rid of other imperfections. Follow the directions on the clay bar kit.

Dry Your Car Immediately

After you've finished washing the exterior of your car, be sure to dry it off right away to avoid water spots. Use a clean rag or chamois, and work from top to bottom.

Choose Wax for Home Use

When waxing your car, choose a product designed for at-home use. Some professional car waxes require special tools.

Tips for Professional Auto Detailing

professional detailing
If you're planning to hire someone to detail your car, make sure you get the most for your money. Be sure to do your research, and ask lots of questions before signing up for a detailing package. As you choose your provider, keep the following tips in mind.

Ask for References

Your auto detailer should be able to provide you with the names of a few of their previous clients. Your vehicle is a major investment, especially if you own a sports car, one-of-a-kind classic, or luxury automobile.

Remove Your Belongings

Remove all valuables from your car before detailing. Even though most people are honest, it pays to err on the safe side when it comes to valuable items. Removing extraneous sports gear and equipment from your car can also help the detailing process go more quickly.

Agree on the Fee

Get a detailed estimate of the services that will be performed, and agree to a set price. You don't want to be surprised by a large bill for services you unintentionally added to the basic detailing package.

Mention Stains and Scratches

Make sure you advise the auto detailing service provider about any problem areas or places of concern in your vehicle. This way, the detailer can pay special attention to spills on the upholstery or scuffs on the paint.

When to Detail Your Car

woman washing car
Cleaning your vehicle does more than give you pride in your ride. It also helps prevent wear and tear on your car's interior and exterior surfaces. Built-up grime can get ground into these areas, causing permanent damage. Frequent cleanings are an important part of car maintenance.
In addition to the regular cleaning you do to keep your car nice, you may want to consider detailing, or thoroughly cleaning, your vehicle a few times a year. These are good times to do a serious clean-up job:
  • In the spring - Winter snow and road salt can cause damage to your vehicle. Give your car a thorough cleaning inside and out once the weather gets warm.
  • After a trip - Road trips often result in a mess. Even after you throw out the empty coffee cups and fast food wrappers, your car may still feel dirty. A good detailing will get rid of any lingering odors or stains.
  • Before a big event - Whether you're taking your car on a special date or using it to transport relatives from out of town, it will look a lot more impressive if it's really clean.
  • Before you sell - If you're planning to sell your car or trade it in at the dealer, thoroughly cleaning it beforehand can increase its perceived value.

Making It Last

Thoroughly cleaning or detailing your car can take several hours, so it's a good idea to minimize heavy-duty cleaning sessions. You can keep your car looking nice by wiping up any spills or smears as soon as you notice them and vacuuming the interior frequently. Also, make use of touch-free car washes as often as possible to keep the exterior clean and shiny. This regular maintenance will help ensure that your car looks as good as new for years to come.
by Kate Miller-Wilson
 

Thursday, January 24, 2013

Auto Upholstery Bay Area - 7 Ways to Prevent Kids from Ruining Your New Car Interior - Cooks Upholstery & Classic Restoration


f you've just purchased a new vehicle, chances are you could use a list of 7 ways to prevent kids from ruining your new car. It's important to keep your vehicle in good condition, especially if your cargo is mostly kids. Here are some tips that can help.


7 Ways to Prevent Kids from Ruining Your New Car

7 Ways to Prevent Kids from Ruining Your New Car

Insurance

Before you buy your auto insurance policy, ask if the policy comes with physical damage coverage or if the company will allow you to add an insurance rider to cover the interior of your car. Tears from sporting equipment, shoes and other sharp objects can ruin a car's interior. Call your insurance broker or ask your insurance company if they provide this type of coverage.

Seat Covers

Many companies design seat covers for all makes and models including sedans, compact cars, minivans, trucks, and SUVs. Look for a company that offers a guarantee on their seat covers as well as videos or printed instructions on installing your seat covers. Most seat cover manufacturers will also provide you with cleaning instructions. Seat covers are a great way to ensure your leather and upholstery seats have a long life.

Interior Cleaning Products

If you car's interior is all carpet and upholstery, try some of these cleaning tips from products found right in your own home:
  • Fast-food Grease - Greasy stains can be removed from both carpet and upholstery by using paint thinner and covering the stain with salt. Make sure the paint thinner you choose passes a colorfastness test by first applying it on a hidden area. Once the greasy stain is absorbed, all you need to do is vacuum the stain to remove it. You can also put cornmeal on the stain and let it sit overnight and then vacuum.
  • Ink Stains - Hairspray is your best bet for removing all types of ink stains from carpet and upholstery.
  • Carsick Stains - Whether it's your kids or your pet that has the carsick accident, try club soda mixed with baking soda and water to remove the stain.
  • Blood Stains - Blood should always be treated with cold water. Mix the cold water with dry laundry detergent to make a paste and apply to the stain. Once it's dry, brush the debris away and vacuum.
  • Frayed Carpet - If car seats or other must-haves for kids are causing your carpet to fray, buy some liquid resin at a craft store and apply to the frayed edges and trim. This will keep the edges from excessive fraying.
If the interior of you car is extremely stained, consider a professional interior cleaning. You can also rent a carpet-cleaning machine and follow the directions to bring your upholstery and carpet back to life.

Car Covers

If you have no room in the garage for your new car or your kids play outside near your parked car, consider a car cover to protect the car's exterior. Empire Car Covers provides covers for all makes and models, and their products are made in the USA. You can also ask your dealership to obtain a car cover for your vehicle. Keep in mind that a genuine manufacturer car cover will cost more but will fit your car better.

Food and Drink Accidents

Prevent drink accidents by purchasing an Insta Sip. This product was recommended by "Created By Mom," and comes in different sizes to fit all types of containers.
The best way to prevent food stains is to allow only "safe" foods inside the car. Ideally, that will list will include foods that are easy to vacuum, like dry cereals, trail mixes, and dried fruits. Avoid fast foods, greasy foods, and foods like pudding or Jell-O.

Warranty Items

When you take your new car in for a scheduled service, ask your mechanic about interior problems. Often inside handles, door mechanisms, and interior roof scratches are covered by the manufacturer's warranty as long as the car is less than three years old and has 30,000 mile on it or less. To protect your car's interior from car seats, make sure you understand how to install the car seat. If you don't know how to install one, ask a mechanic or the car seat manufacturer. Many firehouse stations also offer this service.

DVDs and Electronics

The electronic systems installed in vehicles these days can be costly to repair if it isn't protected. If you have a DVD system that allows children to view movies or play video games in the rear or your vehicle, make sure you set up the movie or video game yourself and protect DVD screens with sticky plastic covers to guarantee a long life. Never let small children play with any components of a DVD system or electronic system without supervision.
Following these 7 ways to prevent kids from ruining your new car can go a long way in car protection. When it comes to protecting your new car, consider investing in some of these useful ideas to keep your car shiny and looking new for years to come.
by Jean Scheid
 

Saturday, January 19, 2013

Auto Upholstery Bay Area - Installing a Convertible Top - Cooks Upholstery Redwood City


Install Convertible Top Rear View

Replacing a convertible top is not overly complicated, but it isn't easy either. It takes a professional 7-8 hours to correctly install and align a top, and that isn't taking into consideration the possible need for the restoration or maintenance of the top frame.
But we think you can do this yourself armed with a few tips, the right tools, and a good set of instructions. You should be able to install a top at home with a couple of buddies in a weekend. To get the insider tricks, we took our project '71 Buick GS convertible to Gary Lette of Redline Auto Sports in Wilson, Oklahoma, so he could give us a hand and make sure it looked good.

Install Convertible Top Weatherstipping

Any top project should begin with an assessment of what parts are needed. Some cars originally came with a vinyl rear window (in upholstery-shop lingo, rear curtain), some came with glass, and some glass-windowed cars often received vinyl replacements after the glass broke. Glass is better but more fragile. Plastic has a tendency to yellow over time. If you are buying your parts from a restoration house such as Year One, ask the staff to recommend the correct style and material. We ended up using the glass replacement back window that came with the top for '68-'72 GM A-bodies. If your A-body is a '64-'67 model, the glass is zipped in; for '68-'72 it is sewn in. In addition to our replacement top, we also picked up a top-pad kit that protects the top from being pinched in the folding mechanism.

Install Convertible Top Staples Off

Virtually every convertible top is installed in the same fashion. The top is stapled to the frame via tack strips. Depending on the age of the vehicle, the tack strip will be either pressed cardboard ('60s and '70s vehicles) or vinyl rubber (modern convertibles). The replacement solution is vinyl rubber-better because cardboard holds water and the top frame is metal. Owing to this, the rear bow on our '71 Buick GS had several sections of heavy rust. While our piece was savable, it was very close to needing replacement. The old cardboard is very difficult to remove and can take hours, so be prepared.
The well liner and water trough sustain a lot of abuse over the years, especially on a leaky top. The water trough is made of thin plastic, and the small tabs are easily broken. Most classic convertibles are missing the troughs altogether. After-market versions are usually made of fiberglass with tough metal mounting tabs. The well liner is your trunk's last line of defense against moisture. This piece of vinyl separates the trunk from the interior of the vehicle, often retaining water for days after a storm. Subjected to water and the sun's harsh UV rays, the material eventually breaks down. Replacing this liner usually requires removing the rear window at the lower bow.


If your top is power-operated, the cylinders and pump could probably use some service. If there is a film of hydraulic fluid under the rear seat, then you likely have a leaky cylinder. An O-ring will sometimes fix the problem, as older cylinders were sealed with a simple felt disc. One of our cylinders had a bent rod, so replacement was the only option. At $125 each they are not cheap, but the ability to hit a switch is nice. The pumps are rebuildable in most cases. Kits should be available for most pumps at your local hydraulic supply or electrical motor rebuild shop.

The weatherstripping has to come off to complete the installation of the top, so you might as well replace it. The key here is to use a quality kit like the one we chose from SoffSeal. Unlike cheap kits that don't have pre-drilled holes and OE-type materials, the complete kit from SoffSeal fits as well as or better than the original and should last as long as the new top.
The major tools needed to complete the installation are an air compressor, a good-quality staple gun, and we suggest professional-quality glue from any upholstery supply shop, sprayed from an inexpensive primer gun with a large fluid tip.
So those are the primary parts and some of the tools you will need. When you are done, the top should be tight so there is no sagging, but not too tight or it will pull out or tear at the staples. One trick to getting the top tight is to work with the windshield latches disconnected and the frame elevated about a foot from the windshield. When the job is finished and the frame is dropped to the windshield and latched, the vinyl will be pulled tight. We've found that even professional upholsterers have to remove and restaple a top several times before they get it just right-it is simply part of the process, so don't expect to accomplish it the first time. Don't give up.


Source: http://www.carcraft.com/techarticles/ccrp_0712_install_convertible_top/viewall.html#ixzz2ID3qBVY7

http://www.cooksupholstery.com

Friday, January 18, 2013

Auto Upholstery San Francisco - Great Car Washing Tips - Cooks Upholstery and Classic Restoration


1958 Chevy Impala
The dishwashing soap myth

Companies that have a vested interest in you buying their products have been spreading the word about all the damage that dishwashing soap will do to your car. Here is my take on all this.

The reason you wash a car is to remove dirt. To do that you need to do several things, most important is you need to make the water....wetter.

This may seem silly at first, what is more wet than water after all? Well, lots of things, but first and foremost, water has a thing called surface tension. This is what keeps water beading on shiny cars, and why you can fill a glass higher than the rim, up to a point. A good car wash soap will act to break down the surface tension. That is why soapy water doesn't bead.

Second, a wash soap must remove grease and dirt. It needs to be a detergent to do that, otherwise you are depending on the action of the wash cloth/mitt on the paint to scrape off the dirt. Not a pretty picture.

Third, a wash soap should make your paint feel slimy or slick, that means it is helping surround those bits of dirt/grease and let them rinse off your car.

I have tried lots of car wash products intended specifically for a car. Here is what I have found:

1. You CANNOT wash and wax your car at the same time. You can only do one or the other well. Any product claiming to do both is a compromise or worse.

2. Dishwashing soap does not "strip" wax off cars. I use Liquid Ivory exclusively on all my cars. Several national champions, 40 year old original paint, and daily drivers. The act of washing with ANY product will take a little bit of your wax off. That is what it's designed to do! Wax is supposed to slowly wear off to keep dirt from embedding in your paint. That is why Carnuba is such a great product. Every time you wipe, wash, rinse etc your car, you strip wax. It's going to happen no matter what you use.

Use a small squirt of Ivory Liquid in a bucket of water. You will get lots of suds. These are essential to helping get the dirt off your paint and away from your car without scratching. Any wash product that doesn't make lots of suds that last, is doing more harm than good. Most car wash specific products do not make good suds, and when you feel the wet paint it is not slick, but grabs at your hand. Ivory is slick and rinses clean.

Wash from the top down, and have two wash mitts/cloths. Use one from the beltline up and another from the beltline down. The Beltline is about the middle of the side of the vehicle. Below this a lot of scratchy silicone build-up and you don't want this in your wash mitt for the top/hood/trunk.

Wash one section at a time and use lots of water at low pressure to rinse. By using a thick stream of water gently played over your car, you can make that surface tension work for you, to help take more beads off the car making it easier to dry.
 
If all you ever did was use a high pressure car wash, it would be worse for your car than always hand washing correctly. But most of us don't have the luxury or time to hand wash every week or two.
 
I use those wand type car washes all the time. In the winter, on non-freezing days, they are great to keep salt/crud off your car when you can't wash by hand. I even use the full service washes once in a while. It's better than leaving acid rain, dirt and worse on your car if the weather won't let you do it right. Search for the newer washes or those that are maintained well. Don't go by the number of expensive cars entering the wash, many times people with too much money don't care what happens to their cars, since they will have a new one next year. Look over the business yourself and see if it looks like it would be at least somewhat kind to your paint.
Super Tip: When washing your car at a wand type wash, use the rinse function and spray at crevices and cracks where dirt can accumulate. You want to get lots of water behind these and clean out the dirt. Remember it's not water alone that causes rust, it's water combined with dirt. If you never rinse these areas they will accumulate dirt and get wet anyway as it rains. Better to power wash them often.
I have a synthetic chamois that I have used for almost ten years. These things are great. I finally found the company that sells them in the next state! The Hydra-Wipe I offer is just $14.95 and will outlast a dozen expensive natural chamois. When it gets dirty, just wash in the sink. If you want a high gloss, then follow with soft white bath towels after using the chamois. This will get rid of the tiny beads left.

source: http://www.dccarcare.com/tipowk/tipowk7.html

http://www.cooksupholstery.com

Thursday, January 17, 2013

Auto Upholstery Bay Area - Should I invest in a new interior for my Car? Cooks Upholstery and Classic Restoration


So you were driving your old classic the other day, when your cell phone slips right through the giant gash in the seat and off into some netherworld. The next 30 minutes are spent digging through what seems like a spider-infested hay bale (German car owners, you know what I mean) to retrieve your communication link with the world. Hey, maybe it's time to invest in a new interior.

Final Frontier

The interior is usually one of the last items completed in a restoration project. It should be done after the paint and bodywork to avoid the inherent overspray and dust that fills every crack. The insides should also not be given much attention until after major mechanical modifications and restoration because of the grease and other potentially fabric-damaging aspects of such labors.

The difficulties of interior restoration are many. It is relatively easy to buy some seat covers and a carpet kit for even the rarest cars. But the difficulties lie in the more unusual parts. Where do you buy a door panel for a 1957 Fiat? What about all of those molded foam panels inside of your classic German cars? No one makes them new, and the used ones you find in popular online auctions are usually high priced and of questionable reputation.
As usual, the first thing you must decide is how you plan on restoring the car. Is it going to be a no-holds-barred, all-original restoration? Or are you going to have it as a daily driver that sees a lot of wear and tear?

Getting Started

Either way, here's the path to saving money and getting better quality workmanship: find yourself an auto upholstery specialist. These people are true craftsmen, tailors for cars, if you will. They know all of the fabrics, leathers and vinyls available and can steer you in the direction of original parts or something that is cheaper, but of similar quality.
The secret is that the auto manufacturers do not make their own materials for interiors. They simply select it from material that is already available from large textile manufacturers or, on occasion, special order the material for a certain color or texture.
A good auto upholsterer will know where to get all of these materials, new and old, and how to cut, trim and sew them into something that looks like it did when new from the factory. Remarkably, they are often less expensive than buying the materials already sewn into shape and installing it yourself.
The vehicle in question today is a 1972 Porsche 914. Porsche purists beware, you may not like what I have done, but let's be practical. This car was originally a joint venture by Porsche and Volkswagen and in its most common four-cylinder configuration, quite slow. They are, however, fun to drive, so it is now my fun commuter car that can be taken to the track occasionally.

Out with the Old

Unfortunately, most of the interior pieces are quite expensive. The carpet and vinyl are all of the special Porsche variety, and we all know that Porsches cost more than Volkswagens. To make matters worse, it is an open-top car that allows the direct rays of the sun to beat down unrelentingly on all its vulnerable plastics. In view of the above, here's what I've done to keep costs down, but still have a car I enjoy driving. (Feel free to pick and choose from these approaches to suit your particular situation.)

Seats: The material used on them was originally from Porsche. It looks very much like the material used in Volkswagens. Not exactly, but it's difficult to tell the difference. They are from the same manufacturer and of the same quality, so I copied the crusty old seat covers with new Volkswagen material. I can't see it when I sit in it and it feels the same through a pair of shorts. If you are a Porsche fan, then have the upholsterer buy original material; it costs about three times more. Even so, it is still far less expensive than purchasing ready-made covers from a Porsche aftermarket supplier.

Carpet: Nearly all that applies to the seats applies to carpet as well. The Volkswagen carpet is very similar, and involves less money. However, it is easier to identify from its more expensive cousin than it was with the vinyl. But it looks good to me, and I will not have to cringe when someone with muddy paws climbs in.

Carpet, Too

There is much more available in carpet styles and textures, but beware. Some versions of carpet are of very low quality, and soon you will find these versions shedding themselves all over your new shoes. As a quick test, try to pull a small strand out from the backing. It should be fairly difficult to do with your fingers.

Door panels: The same material used in the seats is used here as well. However, there are also molded plastic armrests and map holders attached to the door interiors. These have suffered tremendously from age and sun, so it is time to make a decision regarding them as well. It would be very difficult to make entirely new ones, and used ones in only slightly better condition are expensive. To top it all off, I keep bumping my arms on them.

So I take a queue from racing Porsches of old—the RS-style door panel. Basically the 911 RS performance model had a door panel devoid of all unnecessary items, such as armrests and flashy chrome bits. Adding to the excitement was a red nylon strap as a door-pull and latch release. This style was copied in my 914 to be reminiscent of the older racing 911s, red door-pull and all.

Did 914s ever come this way? No, but it looks good, was inexpensive, and I have room to move. Is there an option to my unrelenting purist hacking? Yes, read on.

Comparison

Molded Plastic Gismos: These would include things such as armrests and center console lids. They are often made of molded plastic, with a hard or soft foam molded around them and finally covered with a vinyl. It is sometimes possible to sand down cracks in the vinyl just like you would with flaws in the body of a car, then recover them with new vinyl using special contact glue and heat guns.

If you have ever tried to buy a part like this in good condition from an older or obscure car, then you will understand why the effort of recovering these parts often makes sense.

The dash is also very expensive to replace. There are companies that make a hard molded plastic overlay that glues down to the original dash pad. If installed correctly, it is difficult to tell that the overlay has been used, and this can save you hundreds of dollars.

If the part is made out of solid hard plastic and has faded in the sun, or is just the wrong color, then another option is available to you. Paint. Yes, paint. There are special paints designed just for plastics and vinyl for car interiors. It actually penetrates into the material, so that it is nearly impossible to wear off or chip or scratch. In reality it is more like a spray-on dye. Regular use and even sanding will not wear through to the original color because it has soaked into the plastic, re-coloring it. Make sure to match colors before trying this option. Once you have sprayed it, there is no going back!
Hopefully there is some information here that will make your interior restoration more tolerable and less expensive. Shop around for a good upholstery shop, and ask to see some of the work that they are doing. Make sure to communicate exactly what you want done with the car. (e.g., full factory restoration, or low-budget quality). Being specific will help the business to order the correct materials that you want without having to guess as to your intentions.

Unless you are skilled at working with fabrics, plastics, paint, special adhesives and industrial sewing machines, then you are often money ahead to find a reputable upholstery shop rather than trying to assemble it yourself. Enjoy those cozy new seats and armrests!

source: http://www.automedia.com/Budget_Interior_Restoration/res20040901ir/1
Matt Carlson / autoMedia.com

http://cooksupholstery.com